About Me

- SAI VISHNU BOLISETTY
- Guntur, Guntur, India
- Efficient , Proactive and Self Centered MTA Qualified Tech Enthusiast
Monday 15 January 2018
Sunday 14 January 2018
DUAL BOOT WINDOWS AND LINUX
 |
| DUAL BOOT WINDOWS AND LINUX |
1. To Install Linux First we have to download the Linux There are many distros of Linux
to Select one You can see the TOP 10 Linux Distros here
2.I have used Ubuntu because it is one of the most used Linux distro and you can see this in the above links and you can download Ubuntu here Ubuntu-desktop
3. To Dual-Boot Linux First we need to create a Free space in WINDOWS,To Create a free space in Windows You have to go to CREATE AND FORMAT HARD DISK PARTITIONS MENU IN WINDOWS
4. Then Select the Drive in which you want to Install Linux,and right click on it
5. Then select Shrink Volume option in option menu
6. After selecting Shrink Volume You will see a POPUP menu and type 10240 in the ENTER THE AMOUNT OF SPACE TO SHRINK IN MB .
7.10240 MB means 10 GB you can select more Space if you want but 10 GB is enough
8. press Shrink Button at the Bottom
9. You will find a black box showing 10 GB and UN ALLOCATED beside your drive
(If this Partition is not recognized while installing in further steps then you need to create an extended partition for that you can use this link:
EXTENDED PARTITION STEPS.
Then Repeat the Installation as below)
10. You have to create a BOOTABLE USB OF LINUX ,you can use these links to create a bootable usb:
1. create-bootable-usb-using-rufus
2. create-bootable-usb-using-POWERISO
11. Then GO to your laptop's Boot Menu Enable USB BOOT LOADER and enable USB BOOTING
BOOT KEYS
DELL BOOT MANUAL
12.Inject USB and you can see this menu
13.This step is Optional if you want you can check errors in Disc by selecting CHECK DISC FOR DEFECTS OPTION
14.If you don't want to do it just skip it and go to step 16
15. After checking it will show this screen ,then press any key and it will show the menu again
16. Select INSTALL UBUNTU option in the Menu after selecting you will see this menu
17. Select Language preferred language in the left and press Install Ubuntu
18.After Pressing Install Ubuntu you will see this menu ,Select both the options as per your wish
19.If your Laptop or PC has 4 GB or more RAM select the First Option and press INSTALL NOW and go to Step 33
20.If not select something else and press continue
21. Here,you can see the free space which we freed in WINDOWS
22. Select the Free Space and press + in the left
23. You will see a Pop MENU and type 3072 in size box,that is 3 GB from 10 gb free space
24.In the Use as box select Swap area(which will act as ram)
25.Press OK
26, After allocation of swap area press + again on the Left
27.At use as box select Ext4 journaling file system
28.At mount point select /
29.Press OK
30. After Space Allocation You will see this Menu
31.press Install Now
32.After pressing Install Now you will see this warning ,press continue
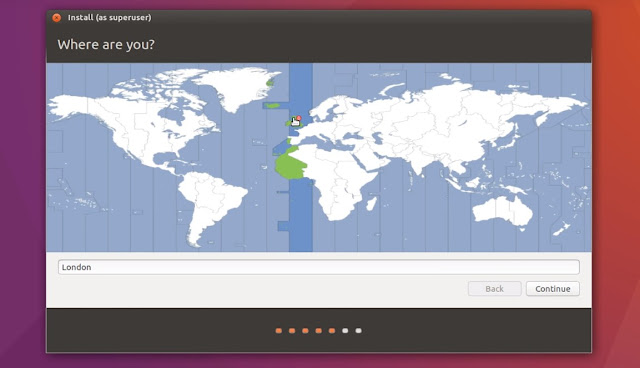
33. Select the country for time and time zone
34. Select the Key Board Layout,for Indians select ENGLISH(US)
35.Press Continue
36.Now you can see this Fill the Information and Press Continue
37. After pressing Continue It will take some time to install
38.After Installation it will show something Like this
39. At last press Restart Now
40.Now your Linux is Ready to Use
Monday 1 January 2018
DEALING WITH A GRUB ERROR AFTER REMOVING LINUX (USING WINDOWS ISO FILE)
1. To Deal with a grub rescue error You need a Windows ISO file or Ubuntu file
2.To deal with this error you should download the Windows ISO File
3. Windows ISO File can be downloaded here Windows 10
4.After Downloading Windows ISO File you have to create a BOOTABLE USB using any software
5. You can create a BOOTABLE USB this links
- USING RUFUS (FREE)
- USING POWER ISO (PAID)
6. Then GO to your laptop's Boot Menu Enable USB BOOT LOADER and enable USB BOOTING
BOOT KEYS
DELL BOOT MANUAL
7. After Inserting USB you we will see this menu select REPAIR YOUR COMPUTER at Bottom and select TROUBLESHOOT
8. After that Select Advanced Option
9.Then Select COMMAND PROMPT in Advanced Options
10.After selecting Command prompt then Type:
- bootrec.exe/FixMbr
- bootrec.exe/FixBoot
- exit
11.Then return the Menu and Select Turn off Computer
12.Then Boot Your Computer Normally By changing BOOT OPTIONS IN BOOT MENU
Subscribe to:
Posts (Atom)


